Unit testing is the process of Testing the smallest part of your source code. Suppose you have so many methods and some of them are dependent on others. To know if those methods are working properly we must test those methods.
Why Unit Testing?
- To improve product quality and maintain it
- To write better code and improve coding style.
- Perform check continuously and that is not possible for human.
How do we start our test?
- To start testing we need to make our source code divided into smallest pieces.
- Then we create test for those pieces of codes.
Setup
Create New Project on your Android Studio from File -> New -> New Project and give this project a name, Select an Activity and just continue. It will automatically import some of the necessary libraries for the project in app » build.gradle file.
dependencies {
    implementation fileTree(dir: 'libs', include: ['*.jar'])
    implementation 'com.android.support:appcompat-v7:28.0.0'
    implementation 'com.android.support.constraint:constraint-layout:1.1.3'
    testImplementation 'junit:junit:4.12'
    androidTestImplementation 'com.android.support.test:runner:1.0.2'
    androidTestImplementation 'com.android.support.test.espresso:espresso-core:3.0.2'
}
Here we will use JUnit for testing.
Folder Format
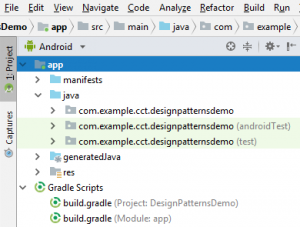
Left side of Your Android Studio, you will see project structure. Select Android from them. we can see that app -> java -> 3 packages
- The app package name
- androidTest
- test
And in test we can see a java file named ExampleUnitTest this is how it’s look like
package com.example.cct.unittesting;

import org.junit.Test;

import static org.junit.Assert.*;

/**
 * Example local unit test, which will execute on the development machine (host).
 *
 * @see <a href="http://d.android.com/tools/testing">Testing documentation</a>
 */
public class ExampleUnitTest {
  @Test
  public void addition_isCorrect() {
    assertEquals(4, 2 + 2);
  }
}
This is a boiler plate code. Now by the left side of addition_isCorrect() method we can see an arrow / run sign. hot that button and you can see android studio will start testing. After a while it will show Tests passed.
Now what just happened. Android studio will test the addition_isCorrect() method and checks if the given value ( 2 + 2 ) and the expected value 4 matches or not. In this case it does that means the method is working like a charm.
Now it’s time for our own methods.
Create Class
Create a class name Calculator.java and in that class let’s just create one method name sum()that will take two parameters and will return the sum of that two parameters.
package com.example.cct.unittesting;

public class Calculator {
  public int sum(int a, int b){
    return a+b;
  }
}
Test
Now we want to test our newly created method if it will work or not. So go tho the ExampleUnitTest file and create and object of the Calculator.java.
Now create a public method called checkSum() and annotate with @Test. This @Test annotation will allow us to test this checksum() method. Inside this method we will call assertEquals() which take two parameters. One is the expected value and other is actual. We will pass the sum() method with the values.
Calculator calculator = new Calculator();

  @Test
  public void checkSum(){
    assertEquals(4,calculator.sum(2,3));
  }
Now press the arrow button beside of the checkSum method and see the output.
what happened? It didn’t pass the test? That’s because you we have passed the actual value of the sum of ( 2,3 ) = 5, but what we expected is 4. So the output will be something like this.
java.lang.AssertionError:
Expected :4
Actual   :5
Now replace calculator.sum(2,3) with calculator.sum(2,2) . This time the code will pass.
The final result will be like Process finished with exit code 0.
Congratulations. We have just written our first Unit Test in android. Even more we have idea how unit testing works.
Second Example
Now let’s go for the second example.
@Testis for marking a method as a test case.assertTrue()is a method to assert (force) the value inside it’s parentheses as TRUE. If the value inside the parentheses evaluates to be false, the test case fails.
assertFalse()is as same asassertTrue()only opposite.
Let’s create another method in the Calculator.java file called isValid() which is boolean.
boolean dataValid = false;

  boolean isValid(int i){

    if(i == 2){
      dataValid = true;
    }else {
      dataValid = false;
    }

    return dataValid;
  }
Now write in ExampleUnitTest like below
public class ExampleUnitTest {

  Calculator calculator = new Calculator();

  @Test
  public void checkSum(){
    assertEquals(4,calculator.sum(2,2));
  }

  @Test
  public void isValidDataAssertTrue(){
    assertTrue(calculator.isValid(2));
  }

  @Test
  public void isInValidDataAssertTrue(){
    assertTrue(calculator.isValid(3));
  }

  @Test
  public void isValidDataAssertFalse(){
    assertFalse(calculator.isValid(2));
  }

  @Test
  public void isInValidDataAssertFalse(){
    assertFalse(calculator.isValid(3));
  }

}
Run the test of whole ExampleUnitTest. You will see that all the test passed but 2 -> isInValidDataAssertTrue() and isValidDataAssertFalse(). Why it happened just comment below. The reason is assertTrue() only requires true value and assertFalse() only require false.
So that’s the end of the basic of the unit testing. If there is any problem that you face please comment below.
You can also follow google test and always stay with androvaid.com.